User Guide
A simple guide for your NZO Cloud.
Access the user guide for helpful information on accessing, running and troubleshooting your NZO Cloud.
Access
1. Initial Set Up
NZO cloud is a unique product in which a custom solution is created specifically for you working directly with an NZO Engineer. Since each solution is highly specialized to fit your needs, a custom hardware design is often necessary before initial set up. You can choose from following:
– A direct point to point VPN Tunnel connected to a shared or dedicated firewall.
– A direct SSL VPN solution that connects your users from their desktops and or devices directly to resources.
– Bring your own connectivity – A solution that allows the you to connect using modern cloud technologies that are already being deployed inside of your infrastructure.
2. A direct point to VPN Tunnel
NZO is all about putting the System’s Administrator, Engineer and IT Staff in control of compute, storage, and network systems using state of the art open source technology. As such, you can choose to take advantage of traditional VPN Tunnels in order to extend your network’s needs. When using a point to point tunnel you are essentially taking your infrastructure and extending it into NZO’s cloud resources giving you access to state of the art resources such as massive compute on bare metal hardware or huge storage arrays. NZO’s direct point to point solution is as simple as working with your networking team and setting up an encrypted tunnel.
3. P2P VPN Tunnel
NZO is all about putting the System’s Administrator, Engineer and IT Staff in control of compute, storage, and network systems using state of the art open source technology. As such, you can choose to take advantage of traditional VPN Tunnels in order to extend your network’s needs. When using a point to point tunnel you are essentially taking your infrastructure and extending it into NZO’s cloud resources giving you access to state of the art resources such as massive compute on bare metal hardware or huge storage arrays. NZO’s direct point to point solution is as simple as working with your networking team and setting up an encrypted tunnel.
4. Direct SSL VPN Connection
Connecting researchers, educators, it staff and other personal can be a daunting task for any System’s Administrator. NZO Engineers can work with you to create direct SSL VPN Tunnels from your users directly to NZO resources.
Accounts
1. Creating Accounts
The syncusers script replicates user accounts across the NZO HPC Cluster making it necessary to add accounts only to the head node.
1. After logging into the head node as root or sudo -i issue the following commands listed below, changing “John Doe” and jdoe to your respective user that you are adding to the system.
# useradd -c “John Doe” jdoe
# passwd jdoe
# su – jdoe
$ exit
# syncusers
*Note: The “su -” step is necessary as ssh keys will be generated for new user accounts upon the first login and also to test the account. Once the keys are in place and the user accounts are synchronized, the user will be able to use “passwordless” ssh, which is necessary for running jobs on the cluster.
2. Managing Accounts
From time to time you will want to check user’s home directories and logins. The following commands and processes listed below will make your life easier as an NZO HPC administrator:
– Checking user’s space in /home
# du –h —max-depth=1 /home/jdoe”
– Monitoring good login attempts
# last
– Monitoring failed login attempts
# lastb
– Monitoring who is currently logged in
# w
3. Deleting Accounts
Below are the steps required to delete a user account on the NZO HPC Cloud. Please make sure to login to the head node as root or sudo –i. I would recomm
# userdel -r jdoe (use without the ‘-r’ to keep user’s home directory)
# syncusers
Groups
1. Adding Users
The syncusers script replicates user accounts across the PowerWulf Cluster™ making it necessary to add accounts only to the head node.
Below are the steps required to add a new user. Be sure to login to the head node as root and type the following (e.g. new user account equals John Doe):
useradd -c “John Doe” jdoe
passwd jdoe
su – jdoe
exit
syncusers
Note: The “su -” step is necessary as ssh keys will be generated for new user accounts upon the first login. Once the keys are in place and the user accounts are synchronized, the user will be able to use “passwordless” ssh, which is necessary for running jobs on the cluster.
2. Deleting Groups
- Below are the steps required to delete a user. Be sure to login to the head node as root and type the following:
userdel -r jdoe (use without the ‘-r’ to keep user’s home directory)
syncusers
Job Control
1. Running A Job
The general procedure and concept of a scheduler is simple. You will essentially create a slurm batch script and then queue it up to be run on the cluster. Inside the script you will request resources that have been allocated to the scheduler(configured in the /etc/slurm/slurm.conf file).
Below is an example of a slurm batch file named example.batch.sh
#!/bin/bash
#
#SBATCH —job-name=”test-job”
#SBATCH —output=”outfile.out.%j”
#SBATCH —ntasks-per-node=32
#SBATCH —nodes=2
#SBATCH —time=00:00:00
#SBATCH —partition=normal
module purge
module load openmpi/4.1.5_gnu
mpirun ./myprogram
From here you would issue the command sbatch example.batch.sh as a user.
2. Monitoring a Job
Once you get your jobs in the queue you will need to monitor it to make sure they are working properly. The following commands can be used in order to view the current status of nodes and also the status of the jobs in the queue.
sinfo – This command will display information about what current nodes are availible and the status that they are in.
squeue – This command will give you information about what jobs are in queue and what robs are currently running.
3. Interactive Job
Interactive jobs allow you to run something on the scheduler with either a prompt or it can give you the ability to troubleshoot through slurm. It is often easier to run something in interactive than trying to track down the node that initially fired off the job.
salloc – can be used to allocate resources
srun – can be used to actually run things in interactive mode.
4. Stopping A Job
scancel <job id#> – This command will stop a job. *Do not issue a kill or a pkill it can take up to a few minutes for the job to cancel out.
5. Repairing Slurm
If slurm is acting strange or not firing jobs off properly it is best to repair slurm for the entire cluster.
In order to restart the slurm services on the entire cluster issue the follow commands:
[root@HeadNode ~]# service slurmctld stop
[root@HeadNode ~]# gsh ‘service slurmd stop’
[root@HeadNode ~]# service slurmctld start
[root@HeadNode ~]# gsh ‘service slurmd start’
A few other things to check
- Make sure the time is correct on all nodes
[root@HeadNode ~]# gsh ‘date’
- The slurm configuration on the head node matches the nodes availible resources. You can verify this with the slurmd –C command.
- The nodes do not have rogue processes running on them. If you allocate resources and they are not available then you will want to know why.
Monitoring
1. Grafana Overview
Grafana is an open-source data visualization tool that allows users to create interactive dashboards and graphs to display real-time data. It provides a range of features such as data parsing, filtering, and drill-down capabilities, making it easy to explore and analyze complex datasets. Users can customize their dashboards with different types of graphs, charts, and widgets to suit their needs. This installation of grafana has been customized to provide an out of the box overview for your NZO HPC resource. Grafana can provide detailed statistics about slurm and your jobs.
2. Accessing Grafana
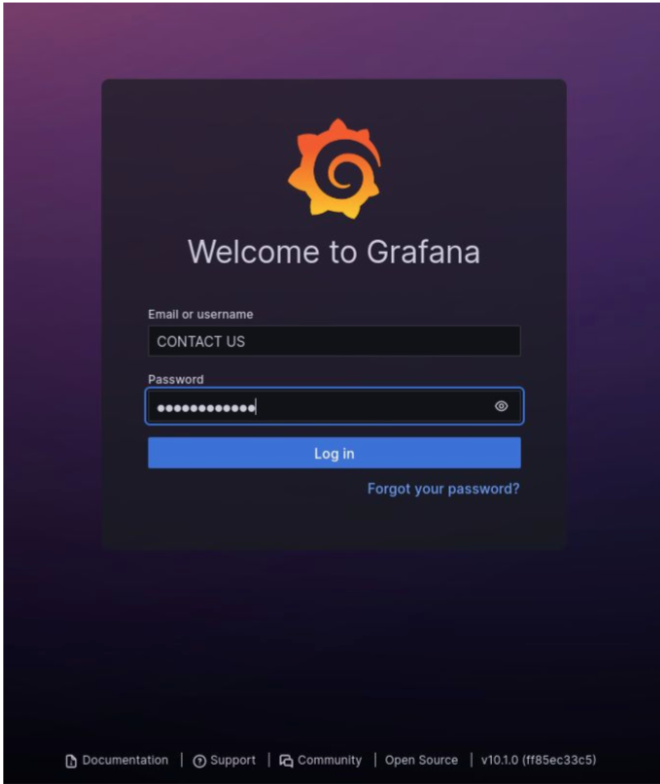
In order to access grafana you will need to use x2go client and login as either the main user or as root. Once you bring up a desktop environment go ahead and open up a web browser to http://localhost:5300 You will be prompted to login please contact us in order to get the username and password.

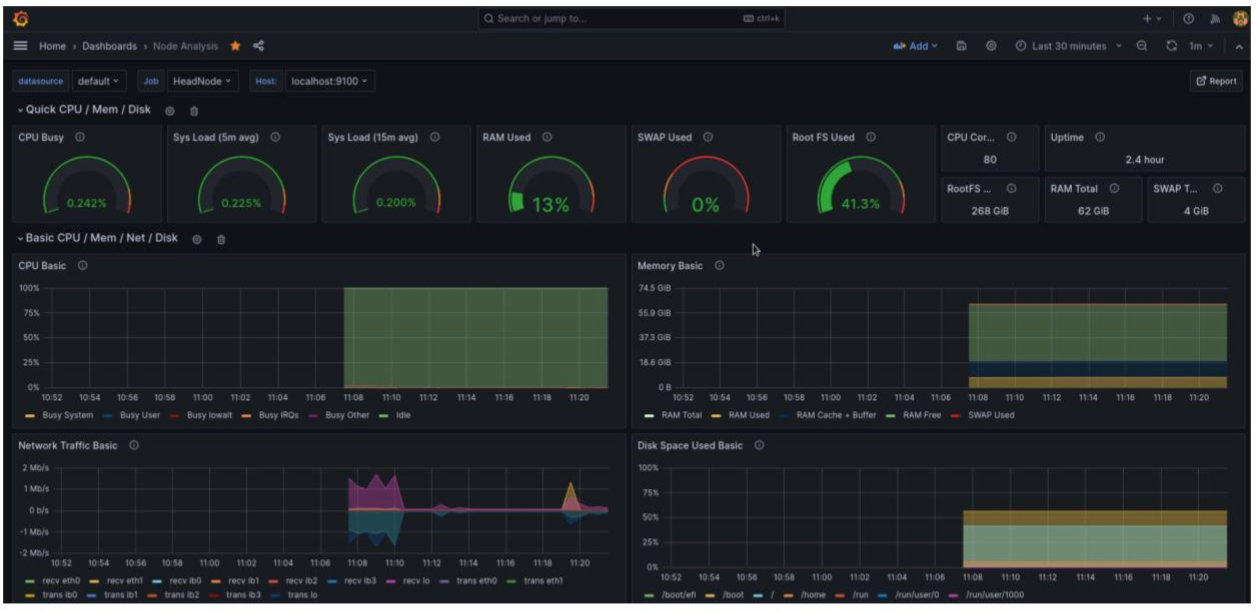
After you login Grafana will prompt you with a splash screen. Go ahead and click the Hamburger button From there you will dashboards and you can click on the preferred dashboard you wish to see. We have included five dashboards, one of which integrates into slurm.

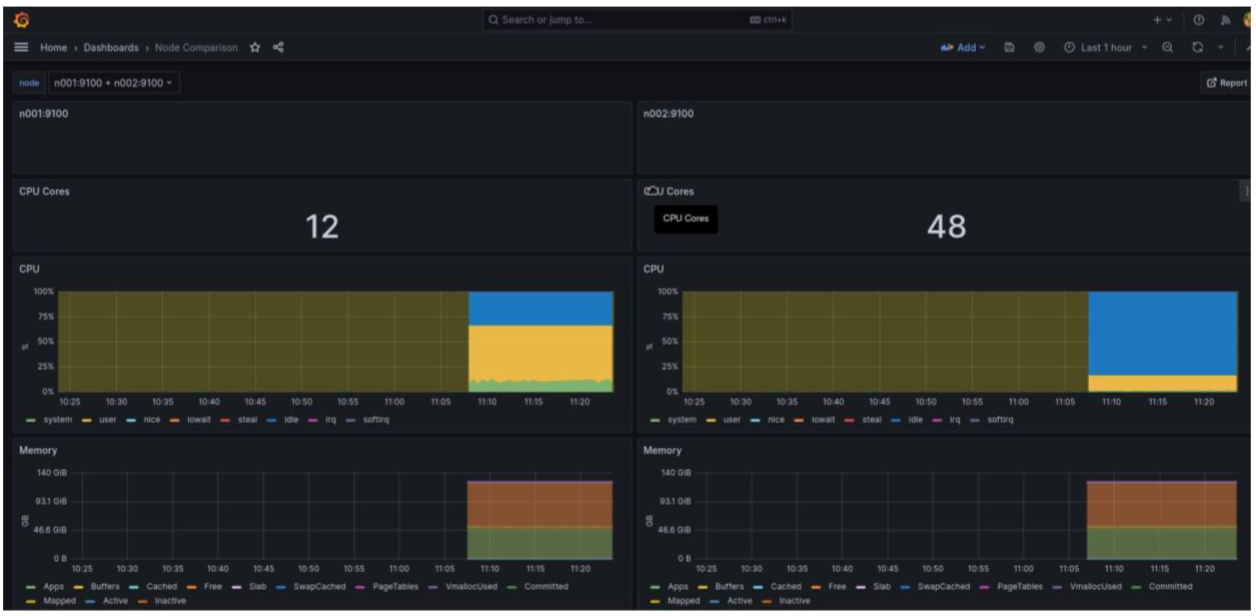
In this example you can see the head node being analyzed while a job is running. If you go to the Node Comparison Dashboard you can do a deep dive on a job that is running across multiple jobs. From this example you can clearly see what resources are available and what resources are being used.

You will notice that some of the dashboards have a Report button. If you click it a new tab will open up with a PDF report, giving you a PDF report
Applications
1. Application Overview
Applications on NZO HPC are designed to handle complex computational tasks that require high levels of processing power and memory. These systems are typically used in scientific and engineering fields where large datasets need to be analyzed, simulated or optimized. NZO HPC is currently used across various industries for a range of applications such as weather forecasting, fluid dynamics, aircraft design simulation, and optimization of complex data sets.
2. Environmental Modules
Environment Modules is a package that will allow scripts to be installed in your NZO HPC cluster. We configure these scripts to be placed in the /opt/modulefiles directory and can expand along with simplify the functionality of your NZO HPC deployment. All of the common shells are accessible to the user and are loaded using the module load command. To see a list of modules that are available on your system you can issue a module avail command.
Typically a job is queued up to the scheduler with a batch file. Inside that batch file you will often see a module purge command followed by a module load <environment modulefile> that will load the environment for your specific script to run the job successfully.
A typical batch file for slurm will look like the follow:
#!/bin/sh
#SBATCH –partition=normal
#SBATCH –time=00:00:00
#SBATCH –nodes=2
#SBATCH –ntasks-per-node=8
#SBATCH –job-name=”slurm-xhpl”
#SBATCH –output=slurm-xhpl.out.%j
module purge
module load openmpi/4.1.5_gnu
cd /home/<someuser>/PSSC-tools/xhpl-gnu
mpiexec ./xhpl-openmpi4-gnu-openblas
You will notice the module purge and module load portion of the script. This makes it easy to implement consistency when running jobs across many nodes.
An example module file to load OpenMPI might look like the following:
#%Module1.0#####################################################################
##
## module-cvs modulefile
##
## modulefiles/module-git. Generated from module-git.in by configure.
##
proc ModulesHelp { } {
global version
puts stderr “\tThis module will set up an alias”
puts stderr “\tfor easy anonymous check-out of this version of the”
puts stderr “\tenvironment modules package.”
puts stderr “\tget-modules – retrieve modules sources for this version”
puts stderr “\n\tVersion $version\n”
}
# for Tcl script use only
set compiler gnu
set version 4.1.5
set topdir /opt/openmpi
set sys linux86
module-whatis “environment variables for ompi 4.1.5”
prepend-path PATH $topdir/${version}_${compiler}/include
prepend-path PATH $topdir/${version}_${compiler}/bin
prepend-path MANPATH $topdir/${version}_${compiler}/man
prepend-path LD_LIBRARY_PATH $topdir/${version}_${compiler}/lib
#if [ module-info mode load ] {
# ModulesHelp
#}
3. Application Installation
Applications can be installed either via the package manager, or through compiling options. The /opt directory on the head node is mounted on all the computational nodes. When compiling applications it is best to compile the application on a compute node using a flag of —prefix=/opt/<nameof application> . While it is possible to compile things on the head node it is generally not best practice to do so.
4. Compilers
Each NZO HPC comes with several compilers that make it easier for users to develop, maintain and optimize their code. We provide basic support (we can install and assist with getting started) with amd/aocc, gcc, intel one and nvidia toolkit.
5. LMod
Lmod is a more modern environment module system that can be installed on your cluster by contacting our team of engineers. It works the same as Environment Modules however it provides a much more convenient way to dynamically change the users paths.
6. Open MPI
Environment modules and the module command will be very useful for loading different versions of OpenMPI required by specific HPC code. To see the OpenMPI modules, run the following command (sample output shown).
[root@clusterhn ~]# module avail openmpi
—————————– /opt/modulefiles ——————————
openmpi/2.1.6_gnu openmpi/3.1.6_intel
openmpi/2.1.6_intel openmpi/4.1.1_gnu(default)
openmpi/3.1.6_gnu openmpi/4.1.1_intel
By default the latest version of OpenMPI compiled with the default GNU compiler will be loaded (e.g. openmpi/4.1.1_gnu).
To load a different openmpi module interactively or within a slurm job, first unload the default version, then load the new version.
[user@clusterhn ~]$ module unload openmpi/4.1.1_gnu
[user@clusterhn ~]$ module load openmpi/3.1.6_gnu
For running jobs, the slurm batch file should also include the module load command so the required version of MPI is loaded on all compute nodes executing the job. The following example is the batch file used to run the cluster’s Linpack test program.
#!/bin/sh
#SBATCH –partition=batch
#SBATCH –time=00:00:00
#SBATCH –nodes=22
#SBATCH –ntasks-per-node=32
#SBATCH –job-name=”slurm-xhpl-316″
#SBATCH –output=slurm-xhpl-316-%j.out
module unload mpi/openmpi-4.1.1_gnu
module load mpi/openmpi-3.1.6_gnu
cd /home/user/PSSC-tools
mpiexec xhpl-openmpi3
You can see which MPI is specified in a node’s PATH using the command, echo $PATH.
[user@clusterhn ~]$ echo $PATH /opt/openmpi/4.1.1_gnu/bin:/opt/openmpi/4.1.1_gnu/include:/usr/local/bin:/usr/bin:/usr/local/sbin:/usr/sbin:/opt/pssc/bin:/home/user/.local/bin:/home/user/bin
Setting a Default OpenMPI
The cluster is configured to load a default OpenMPI version at power on. As of the publication of this manual revision (10/28/21), the default version is 4.1.1. To check the version, run the following command.
[user@clusterhn ~]$ mpiexec –version mpiexec (OpenRTE) 4.1.1
Loading of the default module is a 2-step process: the default modulefile is specified in the .version file in the /opt/modulefiles/openmpi directory and the module file is loaded at power on by including the module load openmpi in the /etc/profile.d/pssc.sh file.
To change the OpenMPI default, modify the /opt/modulefiles/openmpi/.version file to specify the target version. To disable loading OpenMPI at power on, comment out (precede with #) the module load command in /etc/profile.d/pssc.sh . After making any changes to the pssc.sh file, copy this file to the same location on all of the compute nodes. This can be accomplished by running the following command.
gcp /etc/profile.d/pssc.sh /etc/profile.d/.
MPI Sample Commands
Here are some quick examples of ways to use the MPI(s) installed on your system:
This command will use OpenMPI to run the 10 hostname processes across the cluster:
[user@clusterhn ~]$ mpiexec -np 10 -hostfile /opt/machinelist hostname | sort
Instead of running the above command on any random machines, you can specify the machines on which the processes will run. This command will spawn 5 instances of hostname on n001 and another 5 instances on n002:
[user@clusterhn ~]$ mpiexec -np 10 -H n001,n002 -npernode 5 hostname | sort
These are just a couple rudimentary examples of how you can use OpenMPI. To learn more about using OpenMPI, visit their documentation website. http://www.open-mpi.org/doc/
7. Apptainer
Apptainer is an open source container platform that was previously known as singularity community edition. NZO comes with built in support for apptainer and is the prefered way to run HPC workloads. We do not restrict access to public repositories giving you the ability to try various types of software without worrying about messing up your cluster. For those familiar with docker the table listed below gives a good comparison of commands between docker and apptainer:
Apptainer Docker Description
apptainer pull docker:// docker pull Pull docker image
apptainer run docker run Execute container
apptainer build docker build Build a new container
apptainer exec docker exec Run a command within container
apptainer shell docker run -it Enter into a shell within container
apptainer instance start docker run -d Run container as a service
apptainer instance stop docker stop Stop container
The Definition file (.def) Dockerfile Blueprint to build a container
For more information please look at: https://apptainer.org/docs/user/main/introduction.html https://apptainer.org/docs/user/main/mpi.html https://apptainer.org/docs/user/main/mpi.html#batch-scheduler-slurm